How to create weekly or one-day schedules for children?
Login to your iCare account, navigate to a child’s profile or Program/Class details page and follow these simple instructions. For,
A. WEEK SELECTION: To create schedules for a week or more,
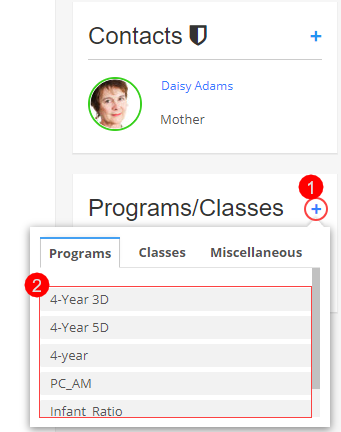
- Click the + icon in the schedule (Program/Class) box and select the program you wish to create a schedule for.

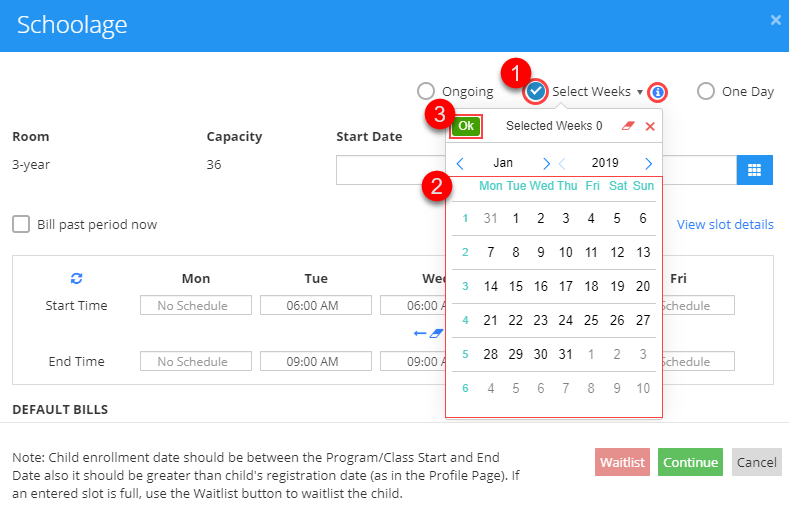
- Enrollment/Schedule Confirmation pop-up will appear on your screen. Choose the Select Weeks option and from the calendar, select week(s) to schedule.

- For continuous weeks, one schedule with the selected Start & End Date will be added. And for discontinuous weeks, different schedules will be created for each discrete date range.
EXAMPLE SCENARIOS:
CASE I: Continuous Weeks.
Child:
Start Date – 1/1/2019 & Discharge Date – 31/12/2019
Selected Weeks:
Week 1: 5/7/2019 to 5/13/2019
Week 2: 5/14/2019 to 5/20/2019
Week 3: 5/21/2019 to 5/27/2019
Schedule: Start Date – 5/7/2019 & End Date – 5/27/2019
CASE II: Discontinuous Weeks.
Child:
Start Date – 1/1/2019 & Discharge Date – 31/12/2019
Selected Weeks:
Week 1: 5/7/2019 to 5/13/2019
Week 2: 5/21/2019 to 5/27/2019
Schedules: Two schedules,
SCHEDULE A: Start Date - 5/7/2019 & End Date – 5/13/2019.
SCHEDULE B: Start Date – 5/21/2019 & End Date – 5/27/2019
B. DAY SELECTION: To create a one-day schedule,
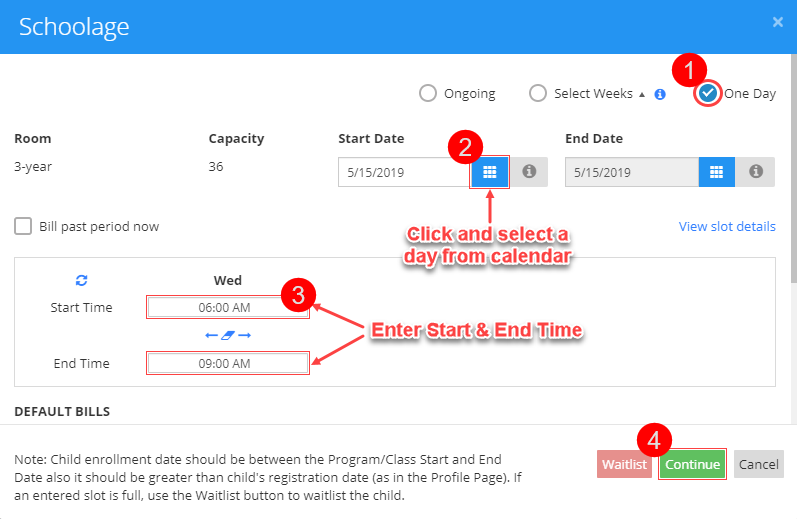
- From the Enrollment/Schedule Confirmation pop-up, choose One-day option and select a Start Date. Add schedule Start & End Time and click Continue to finish.
NOTE: In case of one-day schedule, the End Date will be disabled and will always be equal to the selected Start Date.

- On confirming, a schedule for the week of the selected day will be created with the Start Date & End Date as the week start day and end day. From this week, only the selected day will be scheduled with the added Start & End Time.
EXAMPLE SCENARIOS:
Child:
Start Date – 1/1/2019 & Discharge Date – 31/12/2019
Selected Day:
Start Date (SD) – 5/8/2019 & End Date (ED) – 5/8/2019
Schedule(s):
SD – 5/6/2019 & ED – 5/10/2019


